How to Lock Apps on iPhone
Written by: BestApp.com App Testing Team - Updated: July 13, 2022
Whether you want to focus on being more productive or prevent your kids from accessing certain apps while using your iPhone, locking apps can be a great way to control what apps you do and don’t have access to.
There are a few ways iPhone users can lock specific apps on their phones — each of which takes just a few seconds to set up. To use these methods, you’ll need to make sure your device is running iOS 12 or later so you have access to the Screen Time feature.
With that in mind, here’s everything you need to know about how to lock apps on iPhone.
Why Lock Apps on iPhone?
Locking apps on iPhone is a great way to stay focused and control who can access certain apps on your device.
By learning how to lock apps, you can:
- Maintain your privacy
- Avoid distracting apps
- Prevent your kids from accessing inappropriate content
- Improve productivity
- Hide private personal information
Learning how to lock apps on iPhone takes just a few seconds and makes it easy to improve your device’s privacy and security.
Can You Lock Apps on iPhone?
Yes, you can lock apps on the iPhone using a few different methods. With the introduction of Screen Time, iPhone users can set time limits for apps, lock apps with passcodes, and restrict access to certain apps and iPhone features.
iPhones also offer a unique feature called Guided Access, which lets users control which apps and features others can access while using their devices.
Can You Use Third-Party Apps to Lock Apps on iPhone?
Aside from using your iPhone’s built-in features to lock apps, you can use third-party apps to lock other apps on your iPhone.
Apps like LockID let you create a private, passcode-protected vault where you can store certain apps, photos, and videos to prevent others from accessing them.
If your iPhone is jailbroken, there are several other apps you can use to password-protect certain apps. In general, these are not recommended because jailbreaking your iPhone can create security vulnerabilities and performance issues.
If you want to lock apps on your iPhone, it’s recommended to use your phone’s built-in app-blocking features or stick to verified apps published in the App Store.
How to Passcode-Lock Apps on iPhone
Apple doesn’t offer an official way to passcode-lock apps on iPhone, but by using the Screen Time feature introduced with iOS 12, there is a workaround that lets users password-protect certain apps on their devices.
To start, open the Settings app on your phone, then select Screen Time from the list of options that appears.
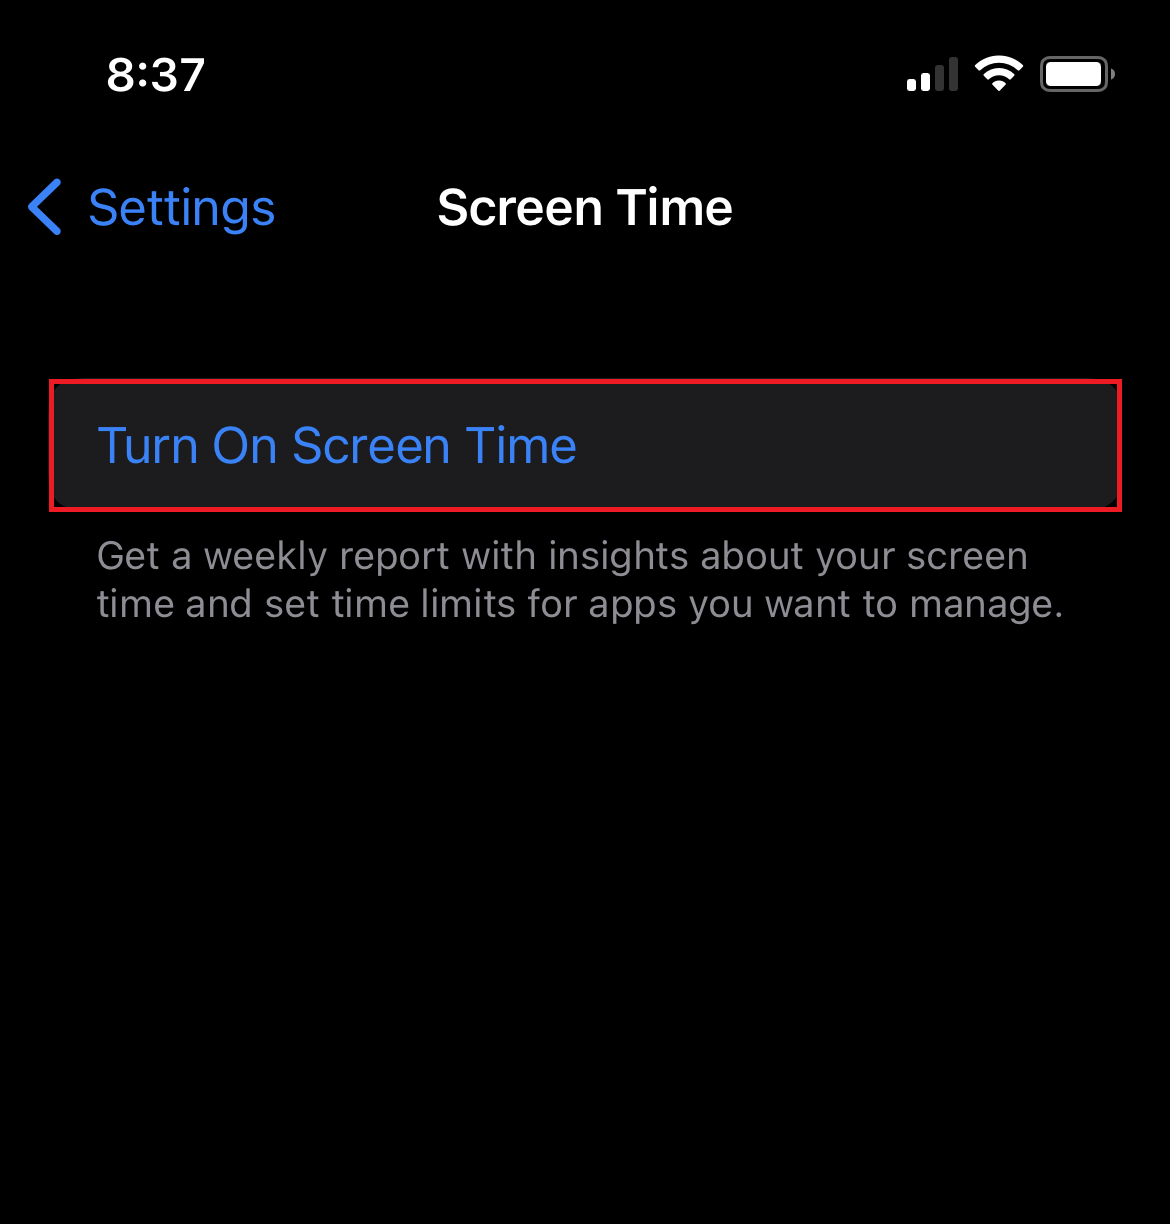
If you don’t already have Screen Time enabled, turn it on by tapping Turn On Screen Time, then tap Continue when prompted to start setting up Screen Time.
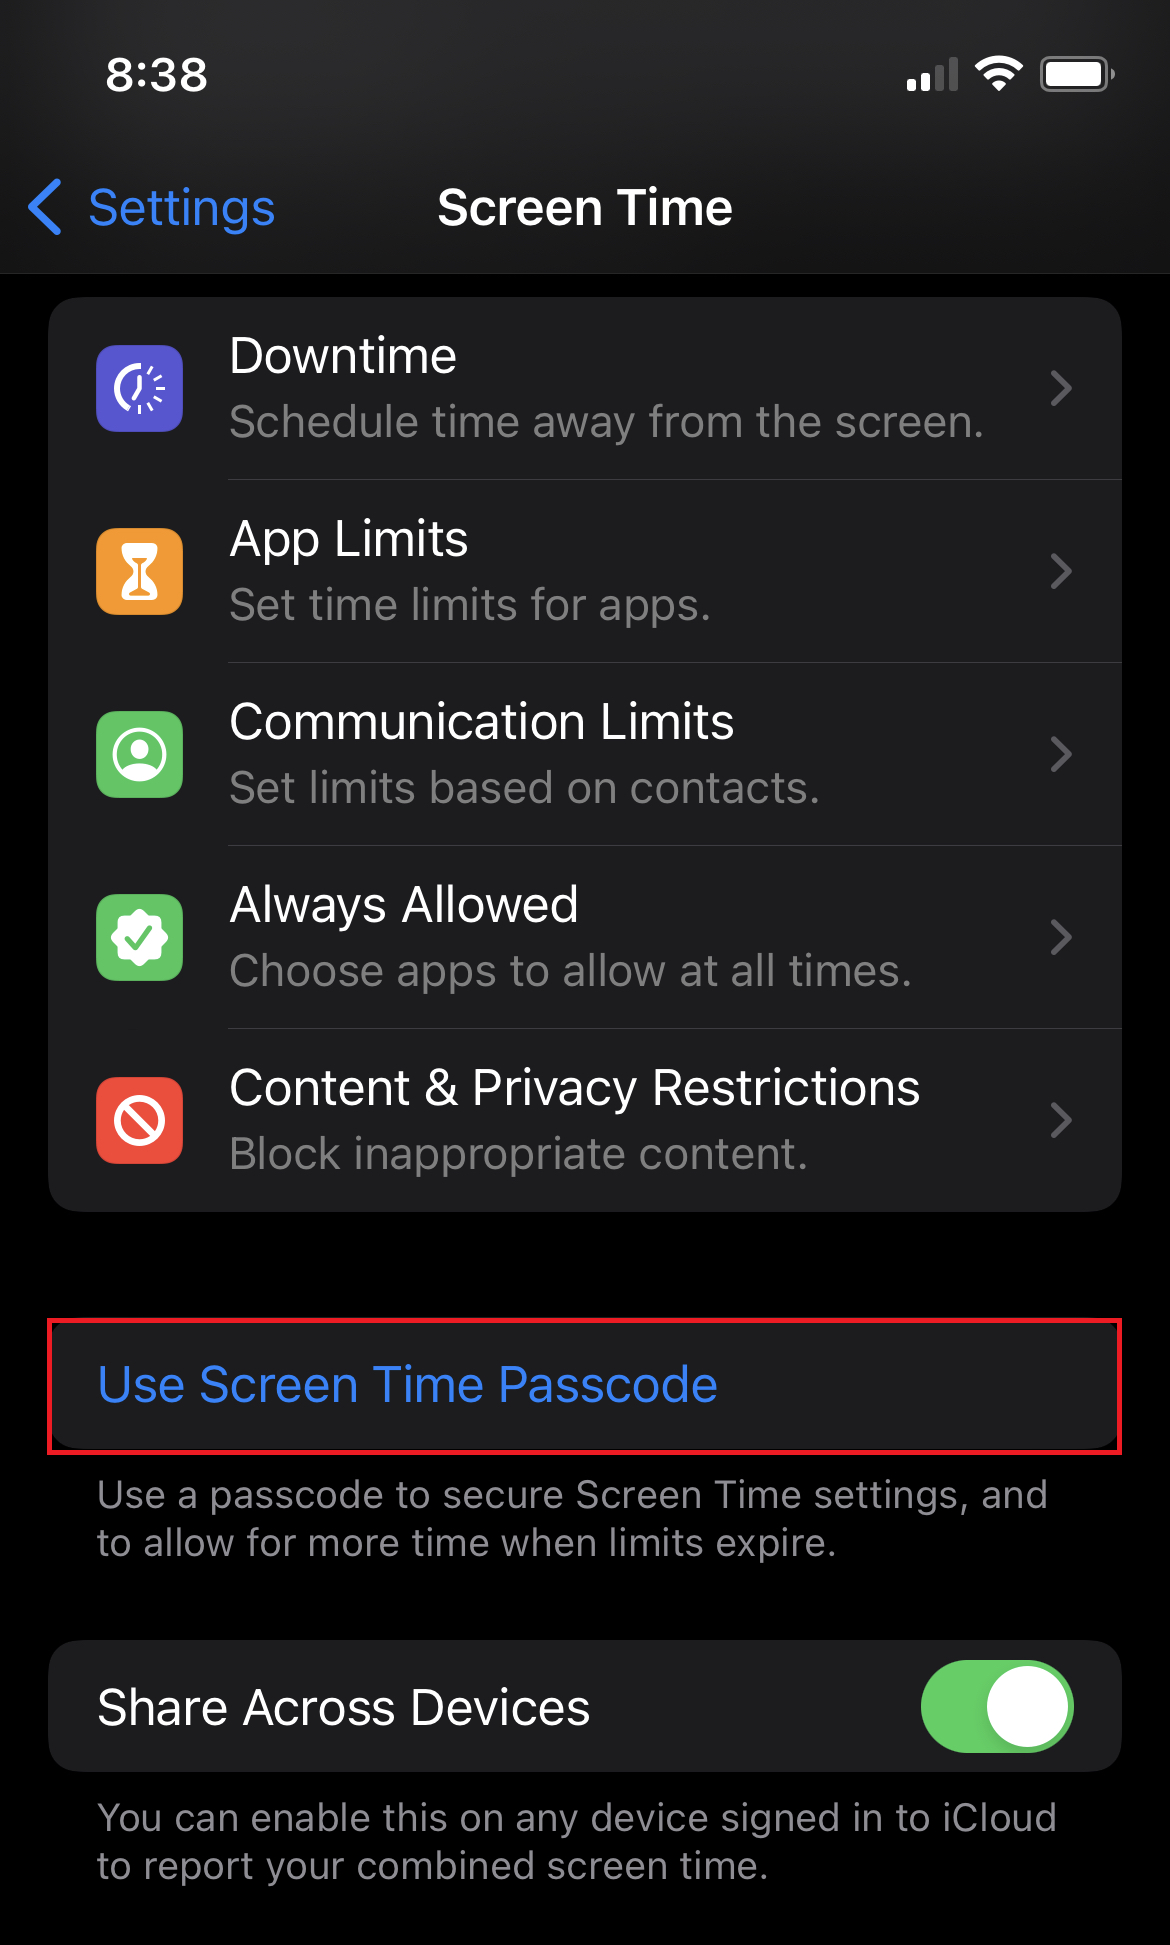
Next, scroll down and tap Use Screen Time Passcode, then enter a custom passcode. This is the passcode you will use to access your locked apps. You may be asked to sign in with your Apple ID before setting your passcode.
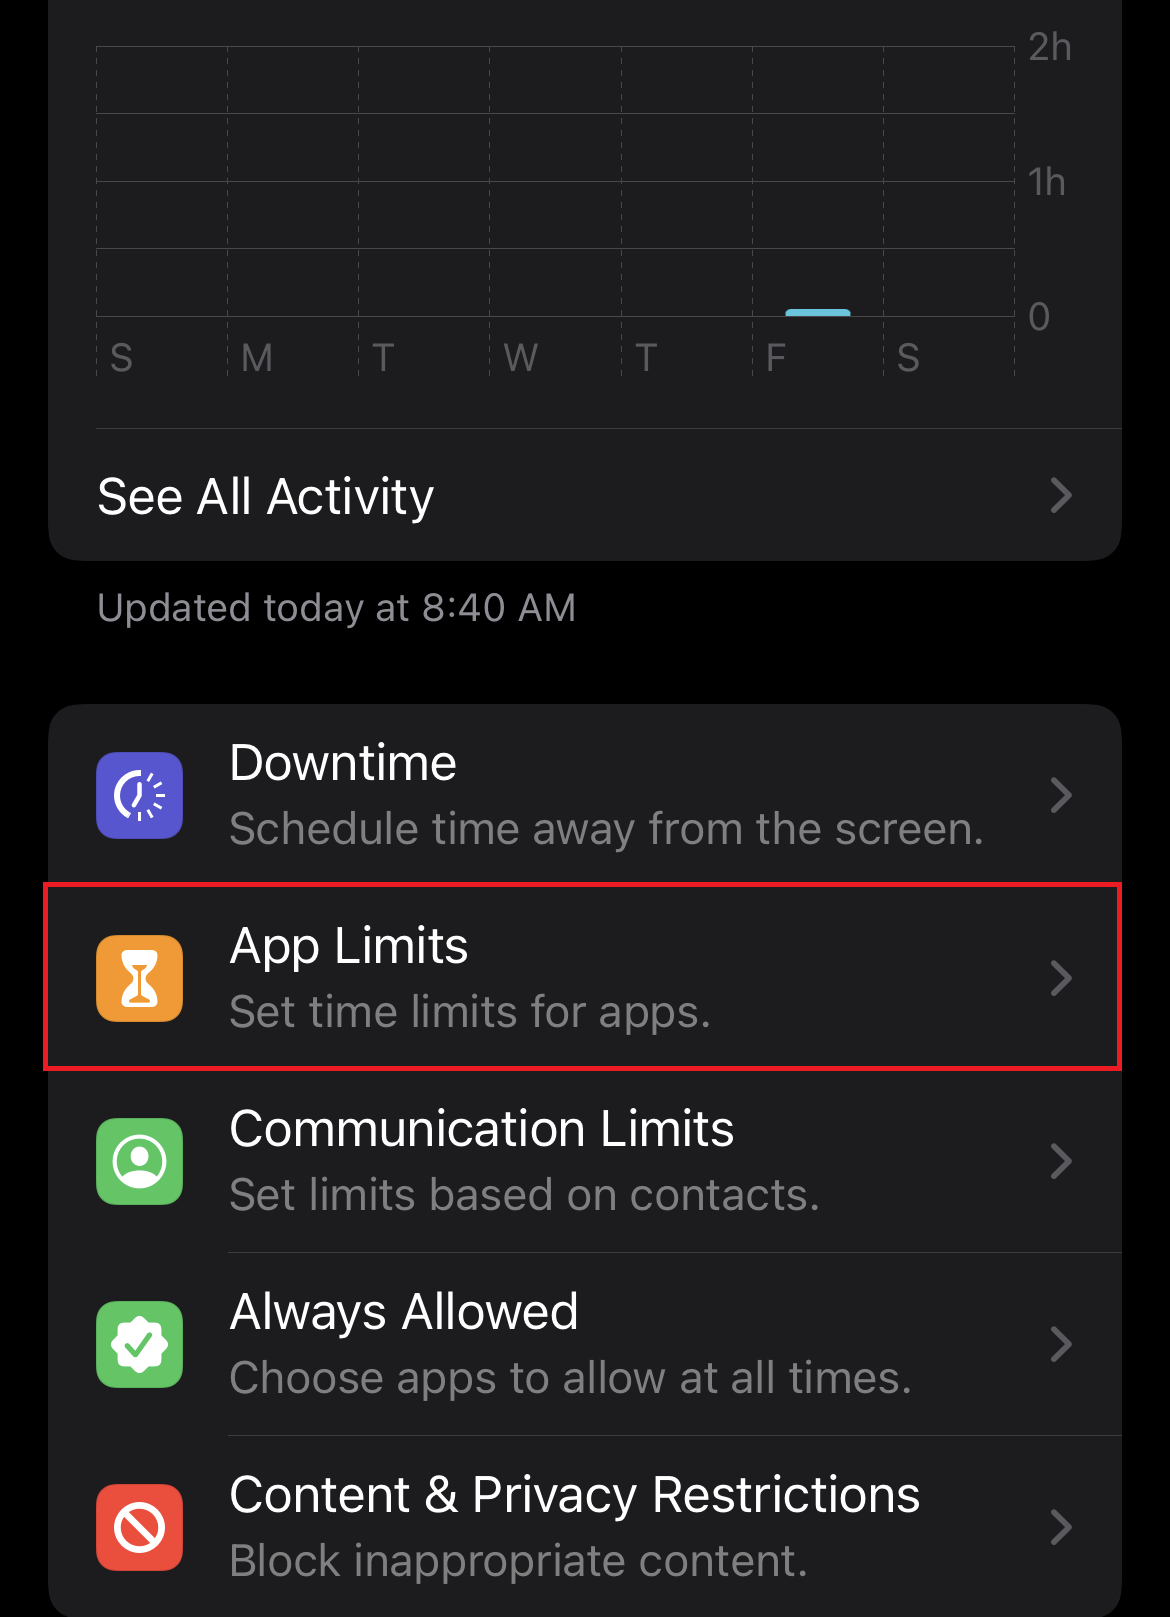
After setting up your passcode, select App Limits, then tap Add Limit on the next page. You will be asked to enter your passcode before proceeding.
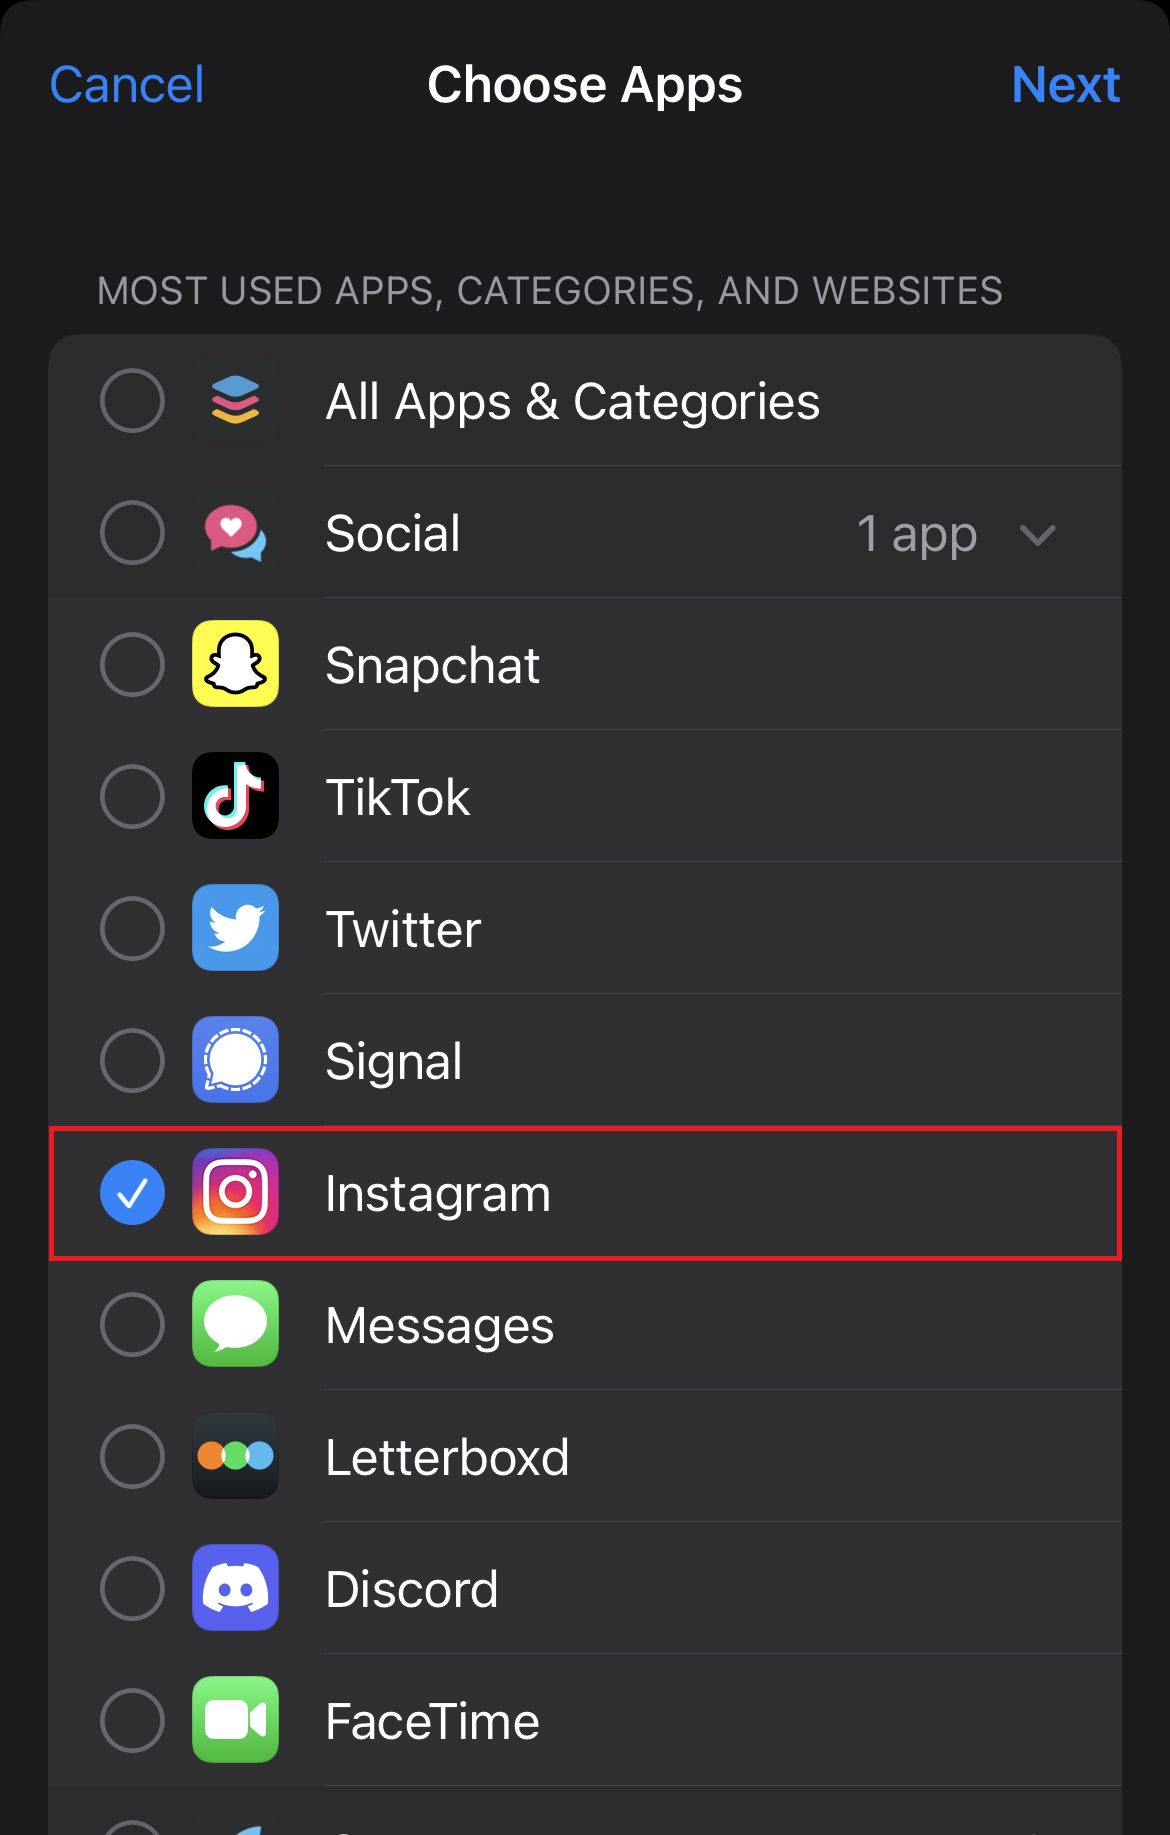
On the next screen, you can choose the apps you want to lock with a passcode. You can select categories, or you can tap the arrow next to each category to expand it and select specific apps. You can also use the search bar at the top. Tap Next at the top-right corner of your screen to proceed after choosing the apps you want to lock.
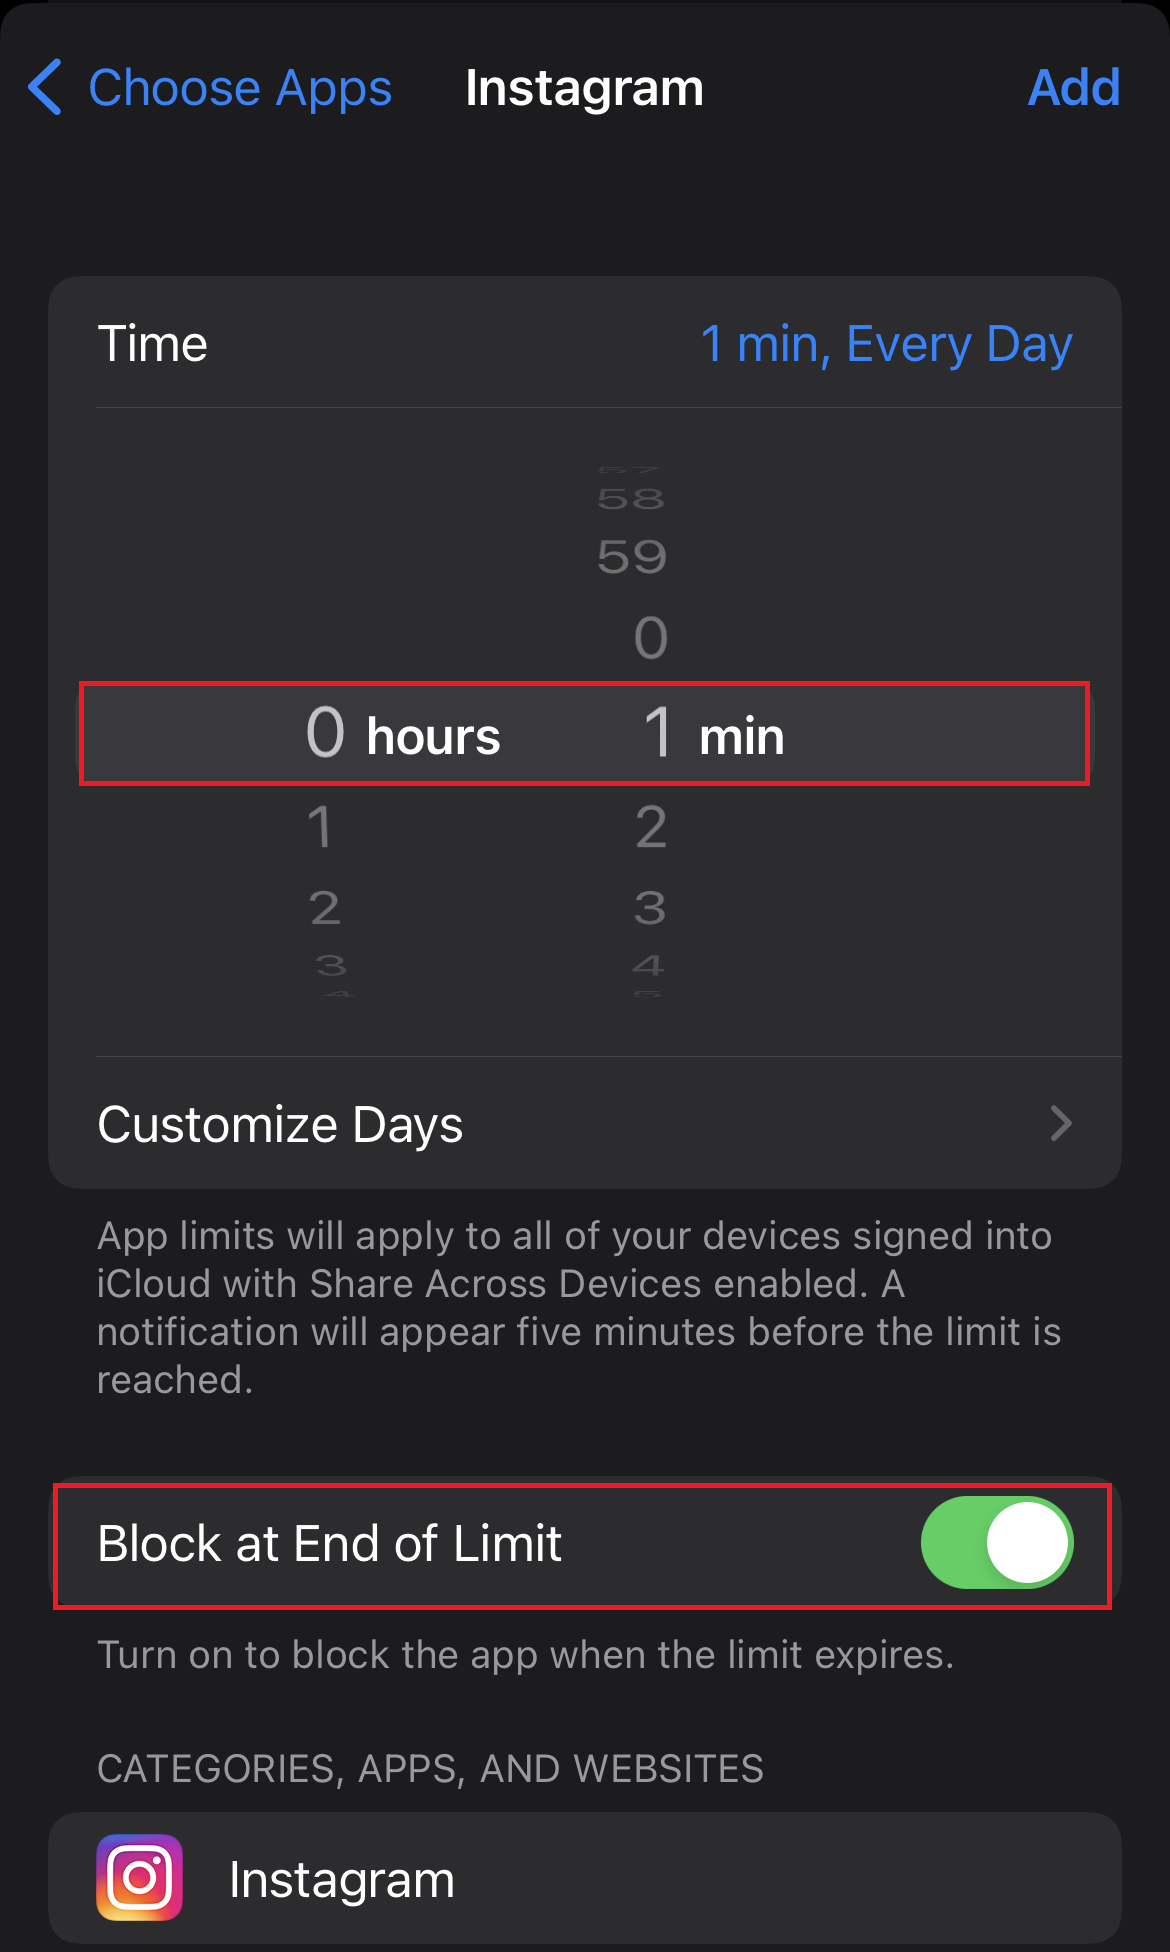
The next page will ask you to set a time limit for the app. Choose 1 min. If not already enabled, toggle on Block at End of Limit, then tap Add at the top-right corner of your screen.
Every day, once the one-minute time limit for the app you selected expires, you’ll have to enter your passcode to continue to use the app.
You can repeat this process to lock more apps, and you can select more than one app at a time if you need to lock multiple apps on your iPhone. You can lock any app on your phone aside from the Phone app.
How to use a passcode-protected app
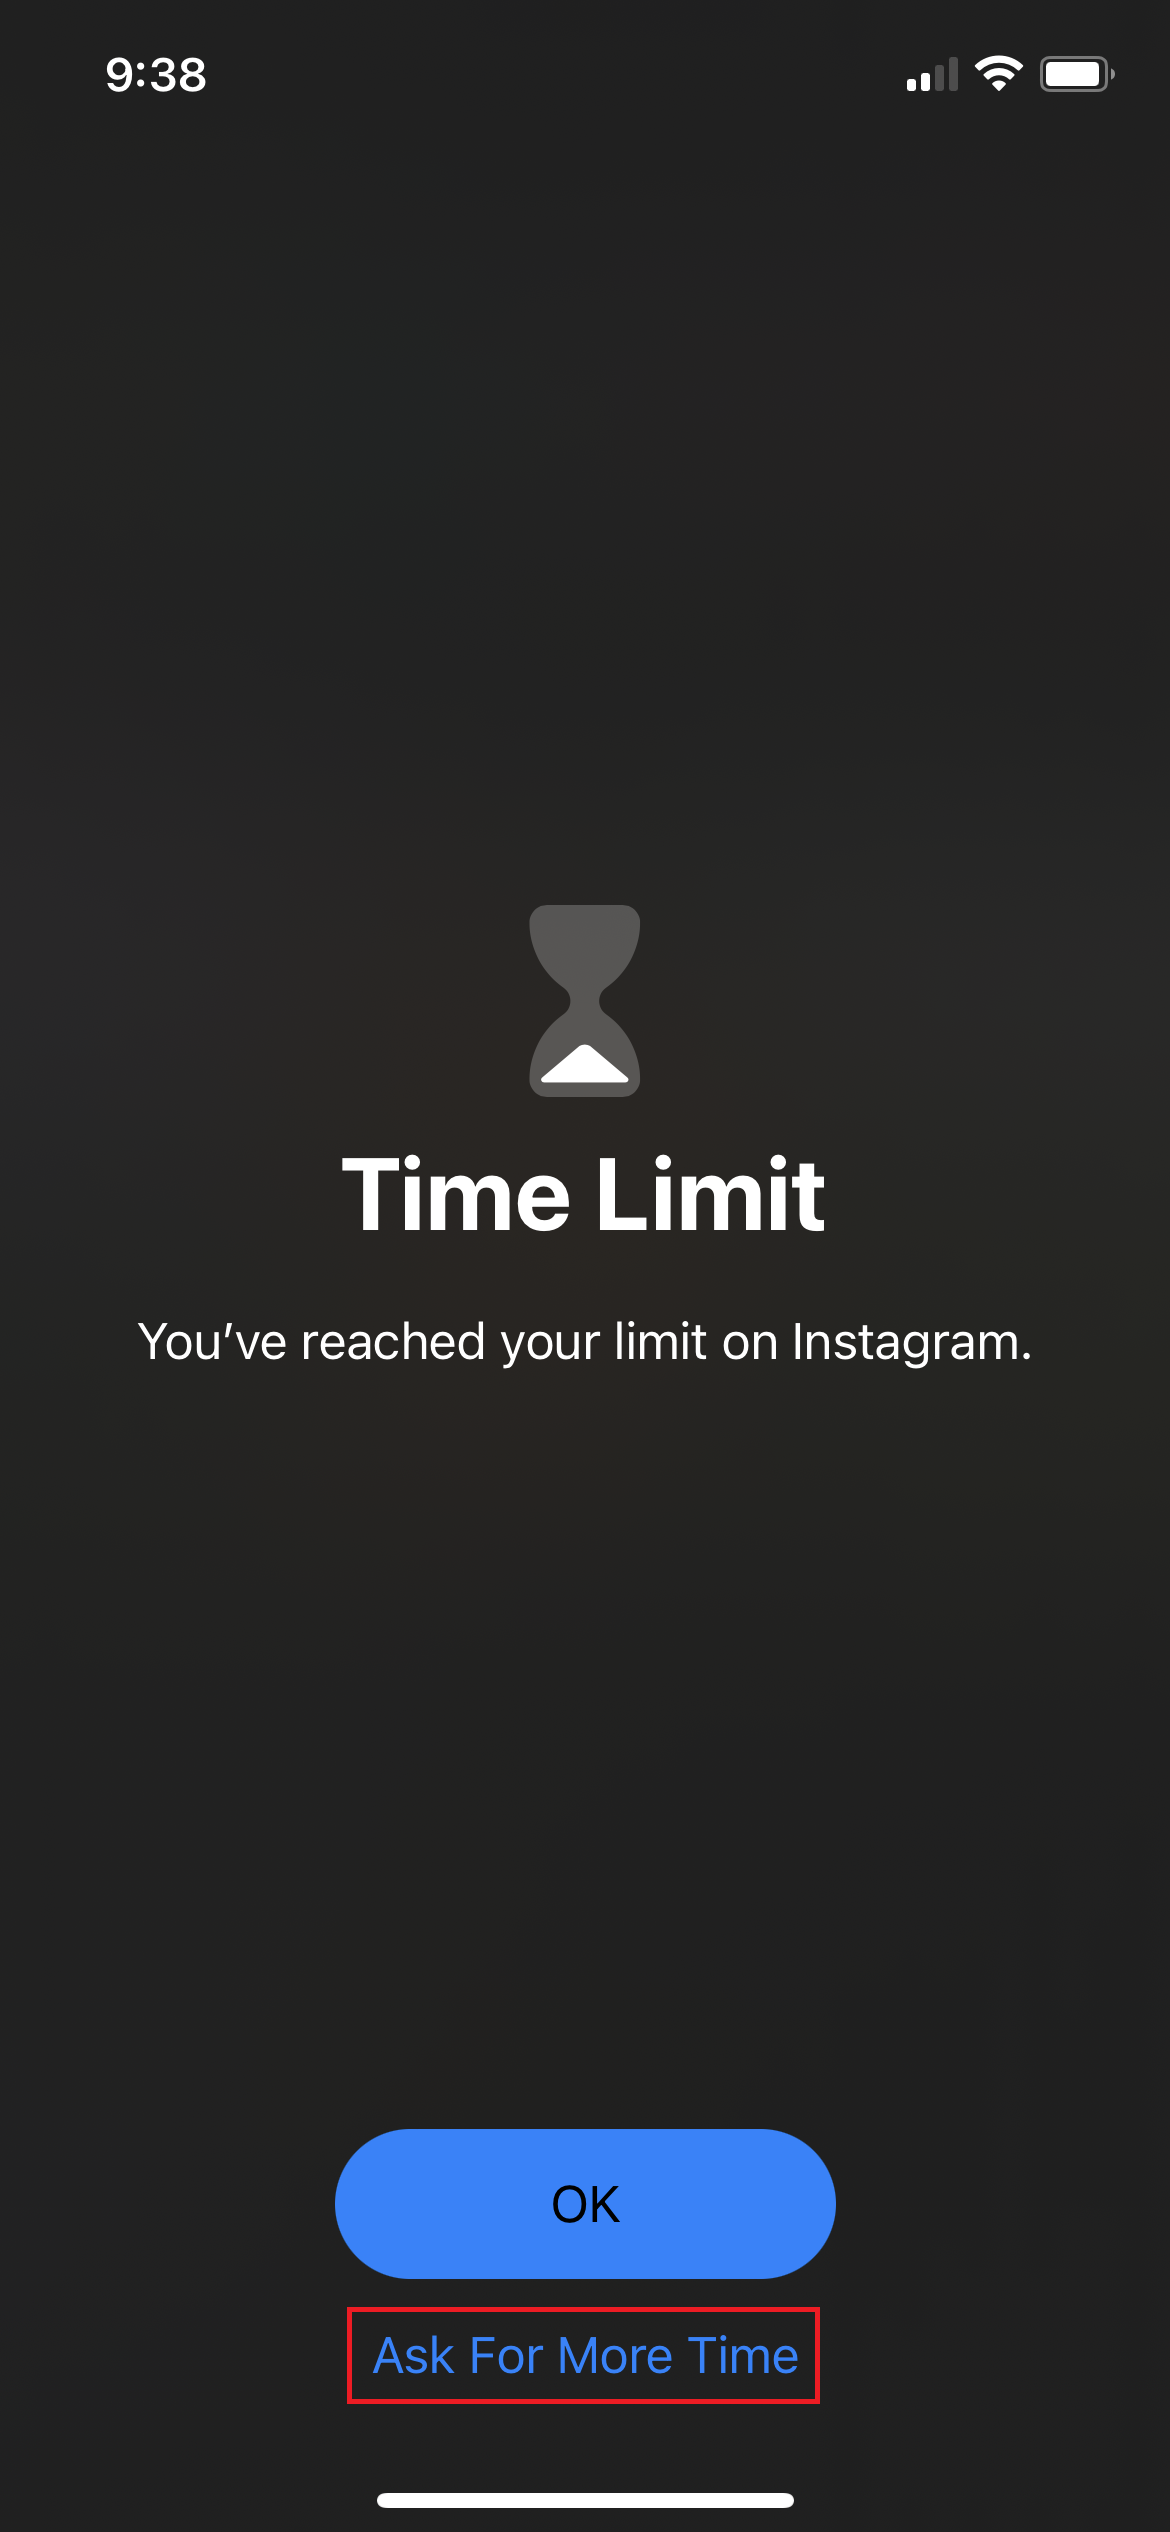
After setting this time limit and using the app for at least one minute, Screen Time will tell you that “You’ve reached your limit on [App Name].”
By tapping OK, you’ll be redirected away from the app, but by selecting Ask For More Time, you can input your passcode to continue using the app without any restrictions.
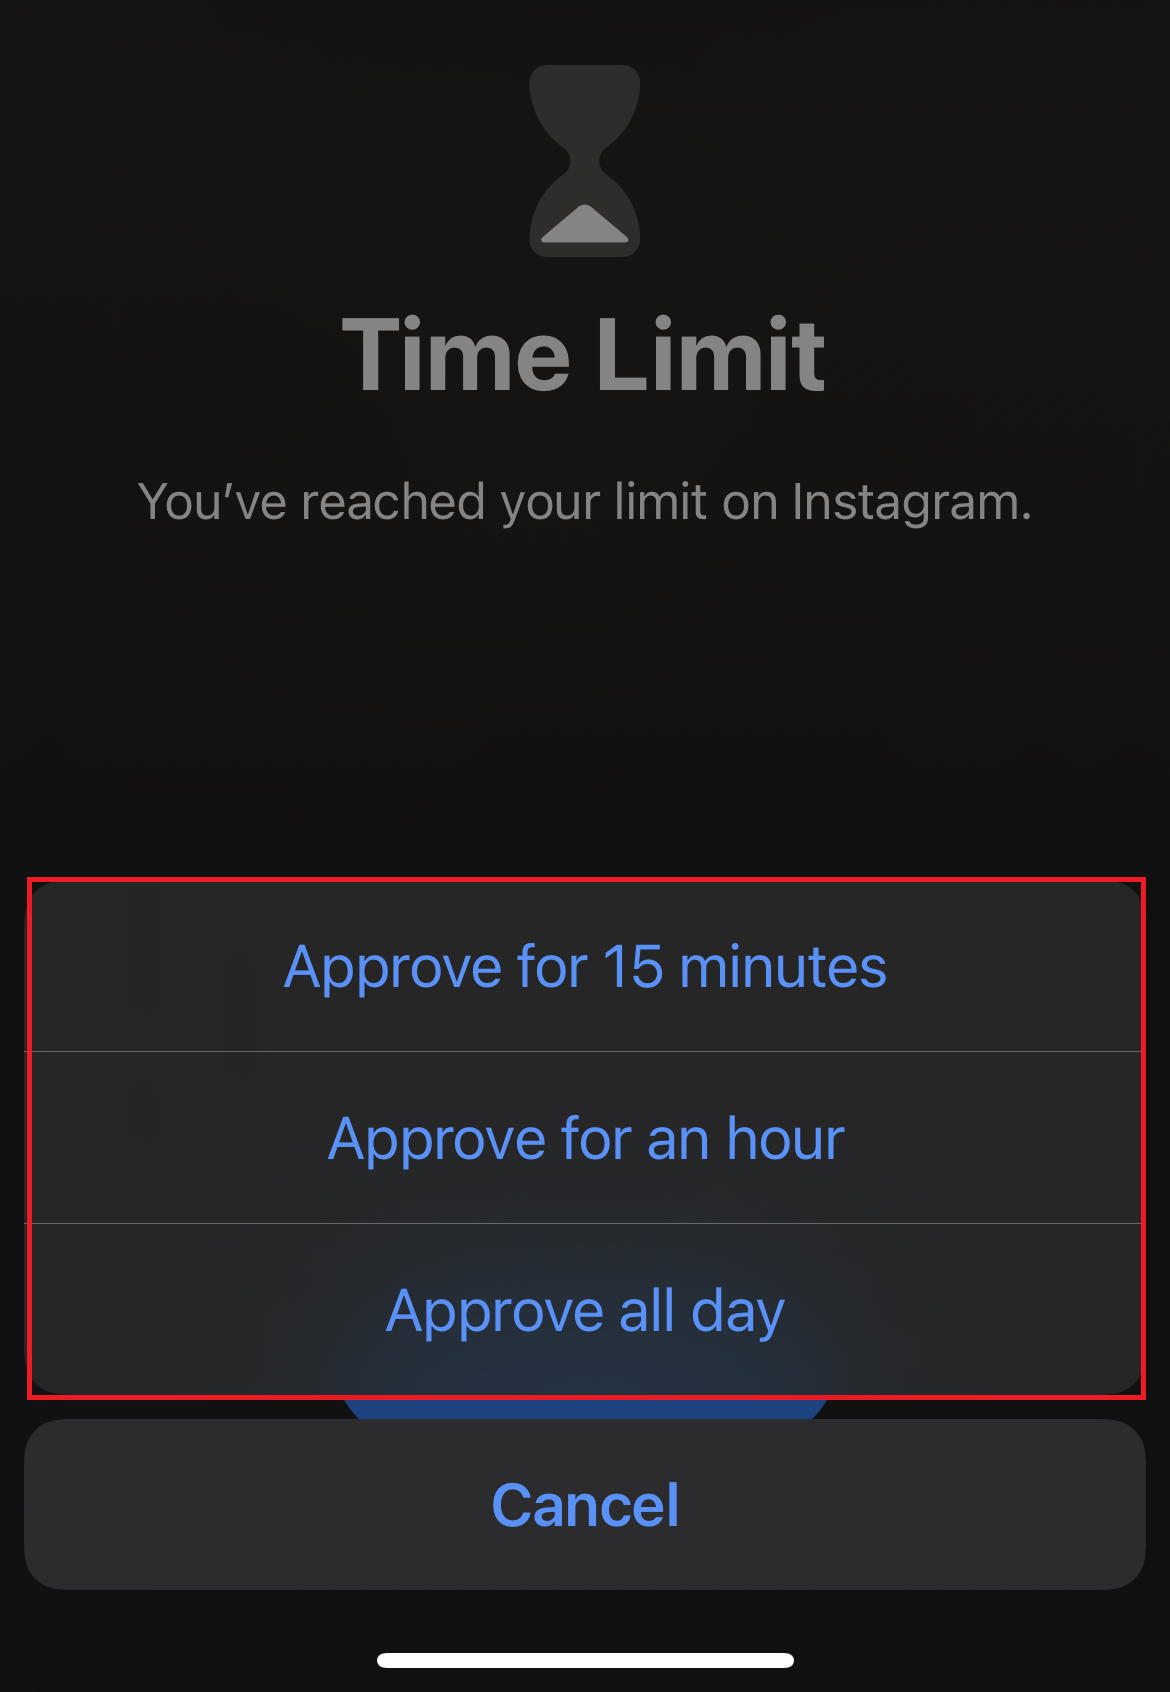
After entering your passcode, you can choose Approve for 15 minutes, Approve for an hour, or Approve all day. Select whichever option you want to continue using the app for.
How to Block Apps on iPhone
iPhone users can also completely restrict access to certain apps. This can be useful for parents who want to prevent their children from accessing inappropriate content, or students and workers who want to temporarily disable access to certain apps while they focus on their work. However, this does not work for all apps installed on your phone — only a selection of preinstalled apps.
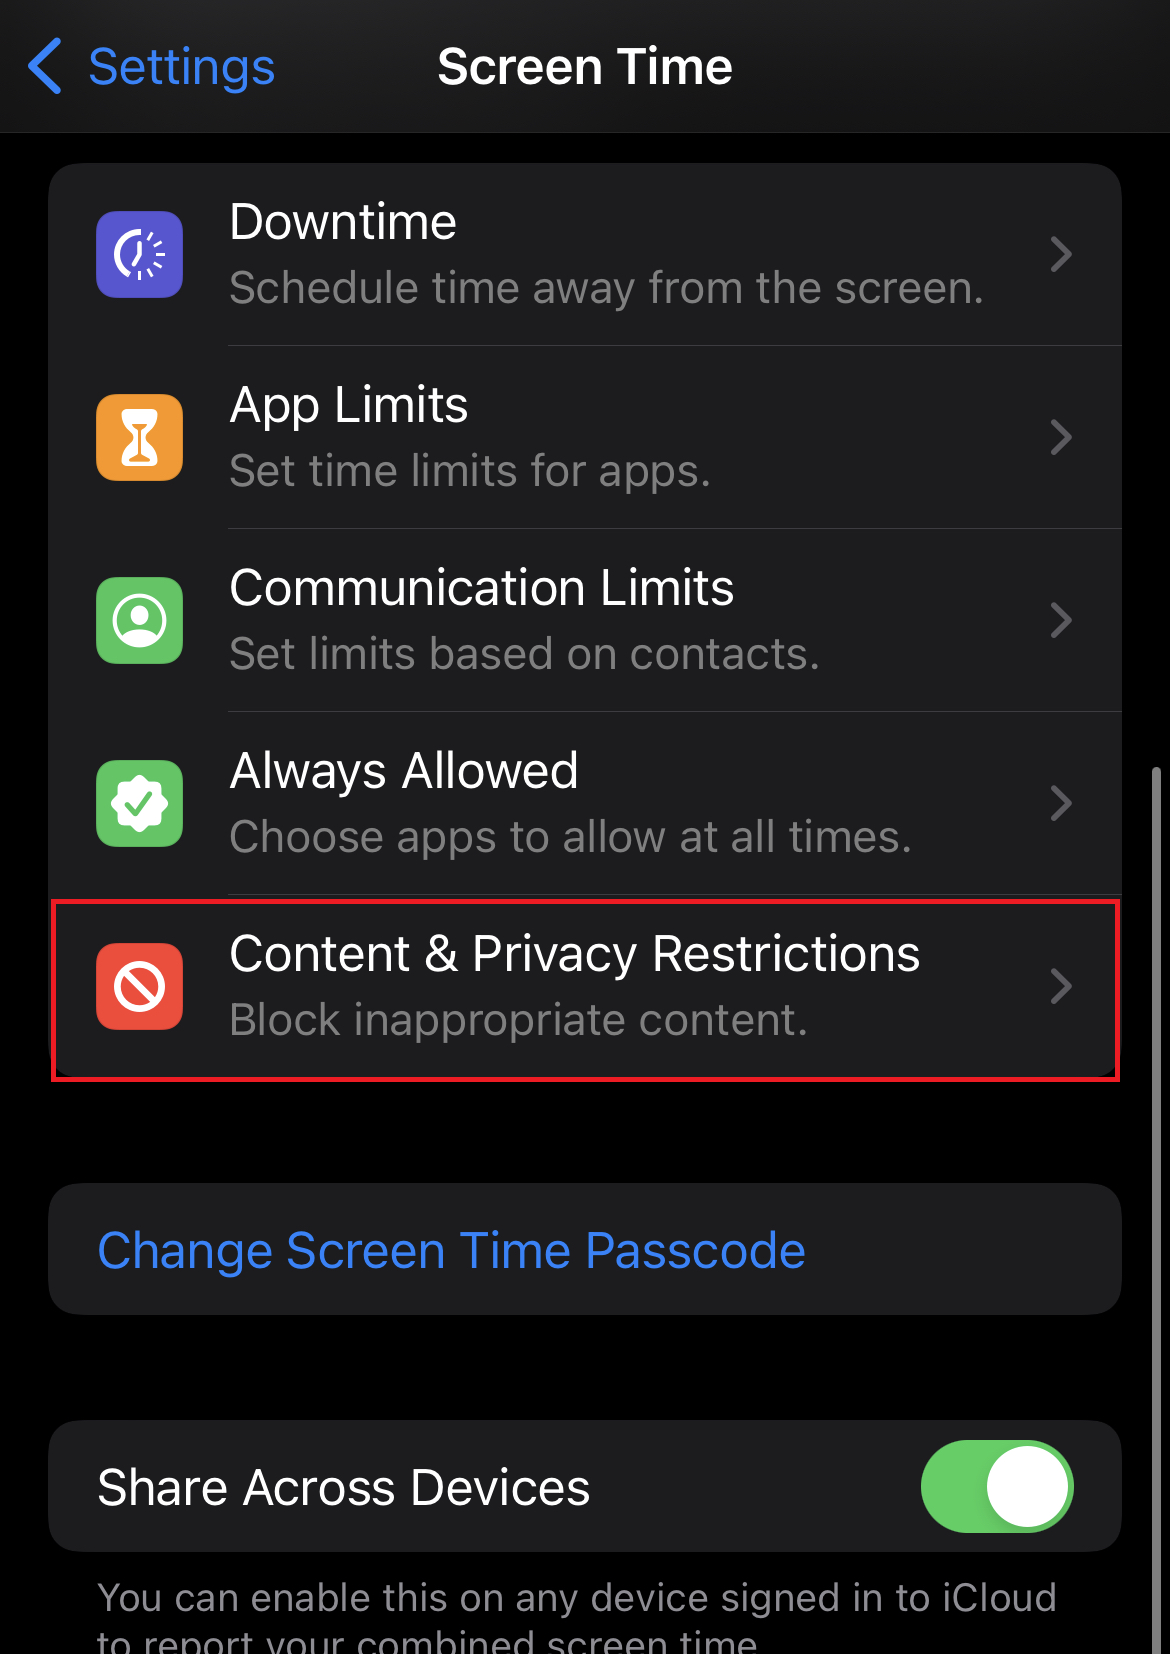
To start, return to the Screen Time settings menu by opening Settings and tapping Screen Time.
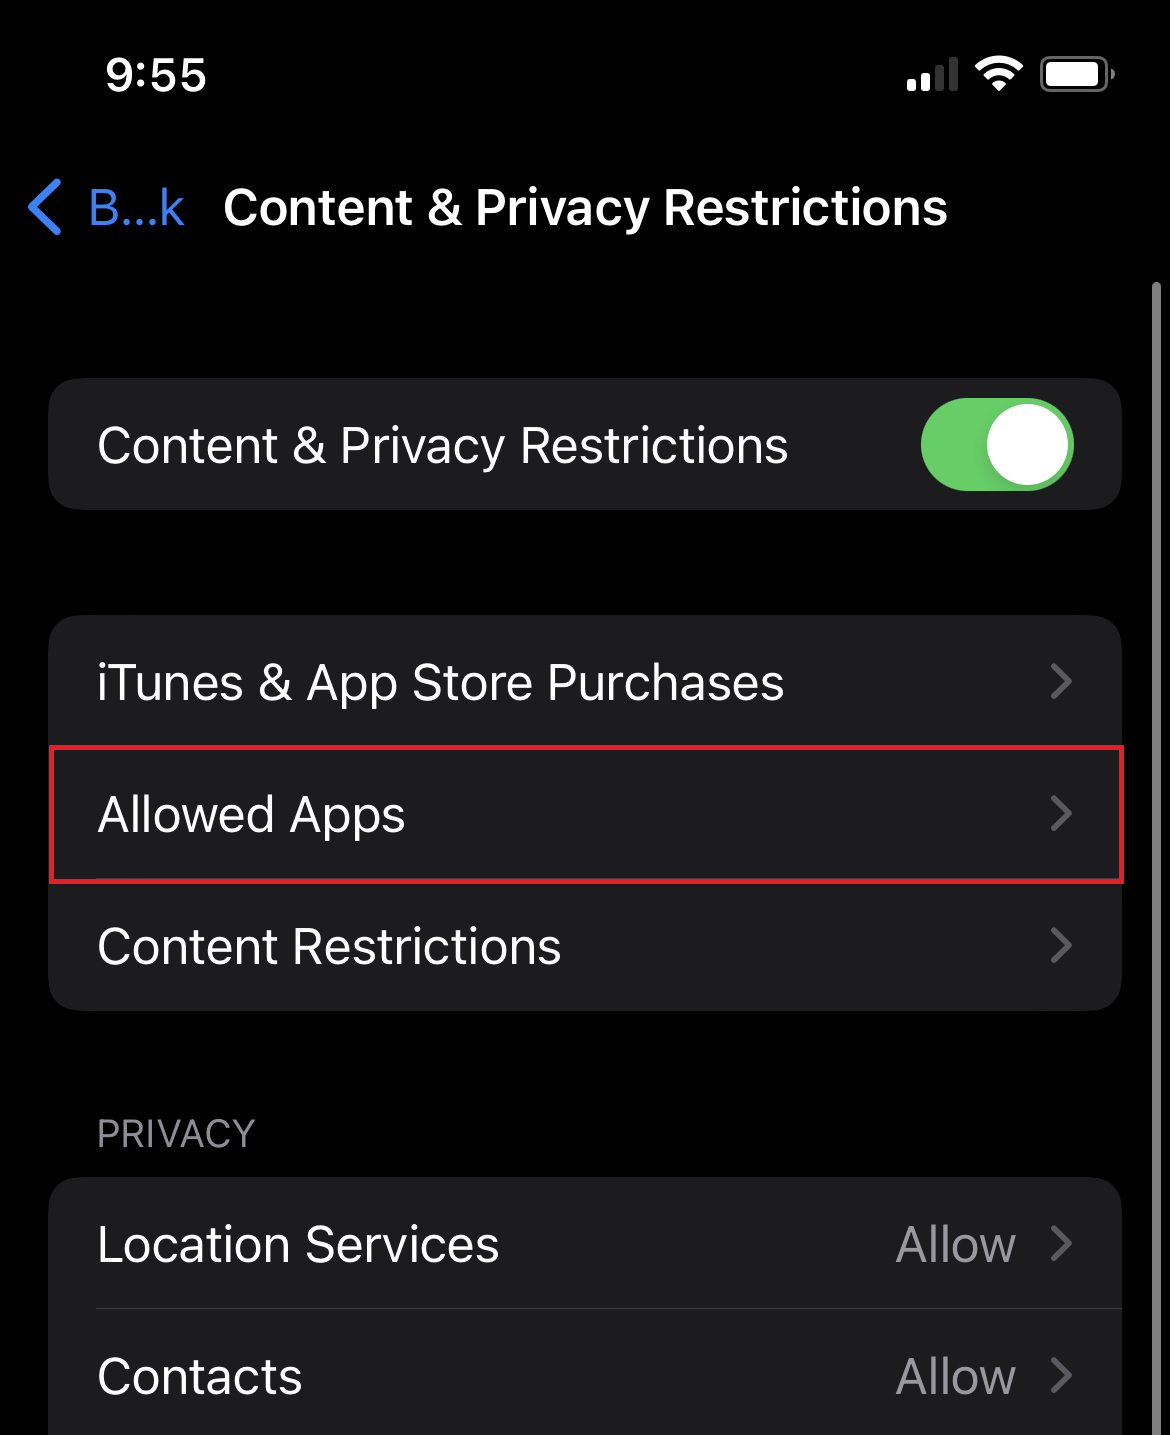
Next, tap Content & Privacy Restrictions. This will take you to a page where you can allow or disallow access to a variety of apps and features.
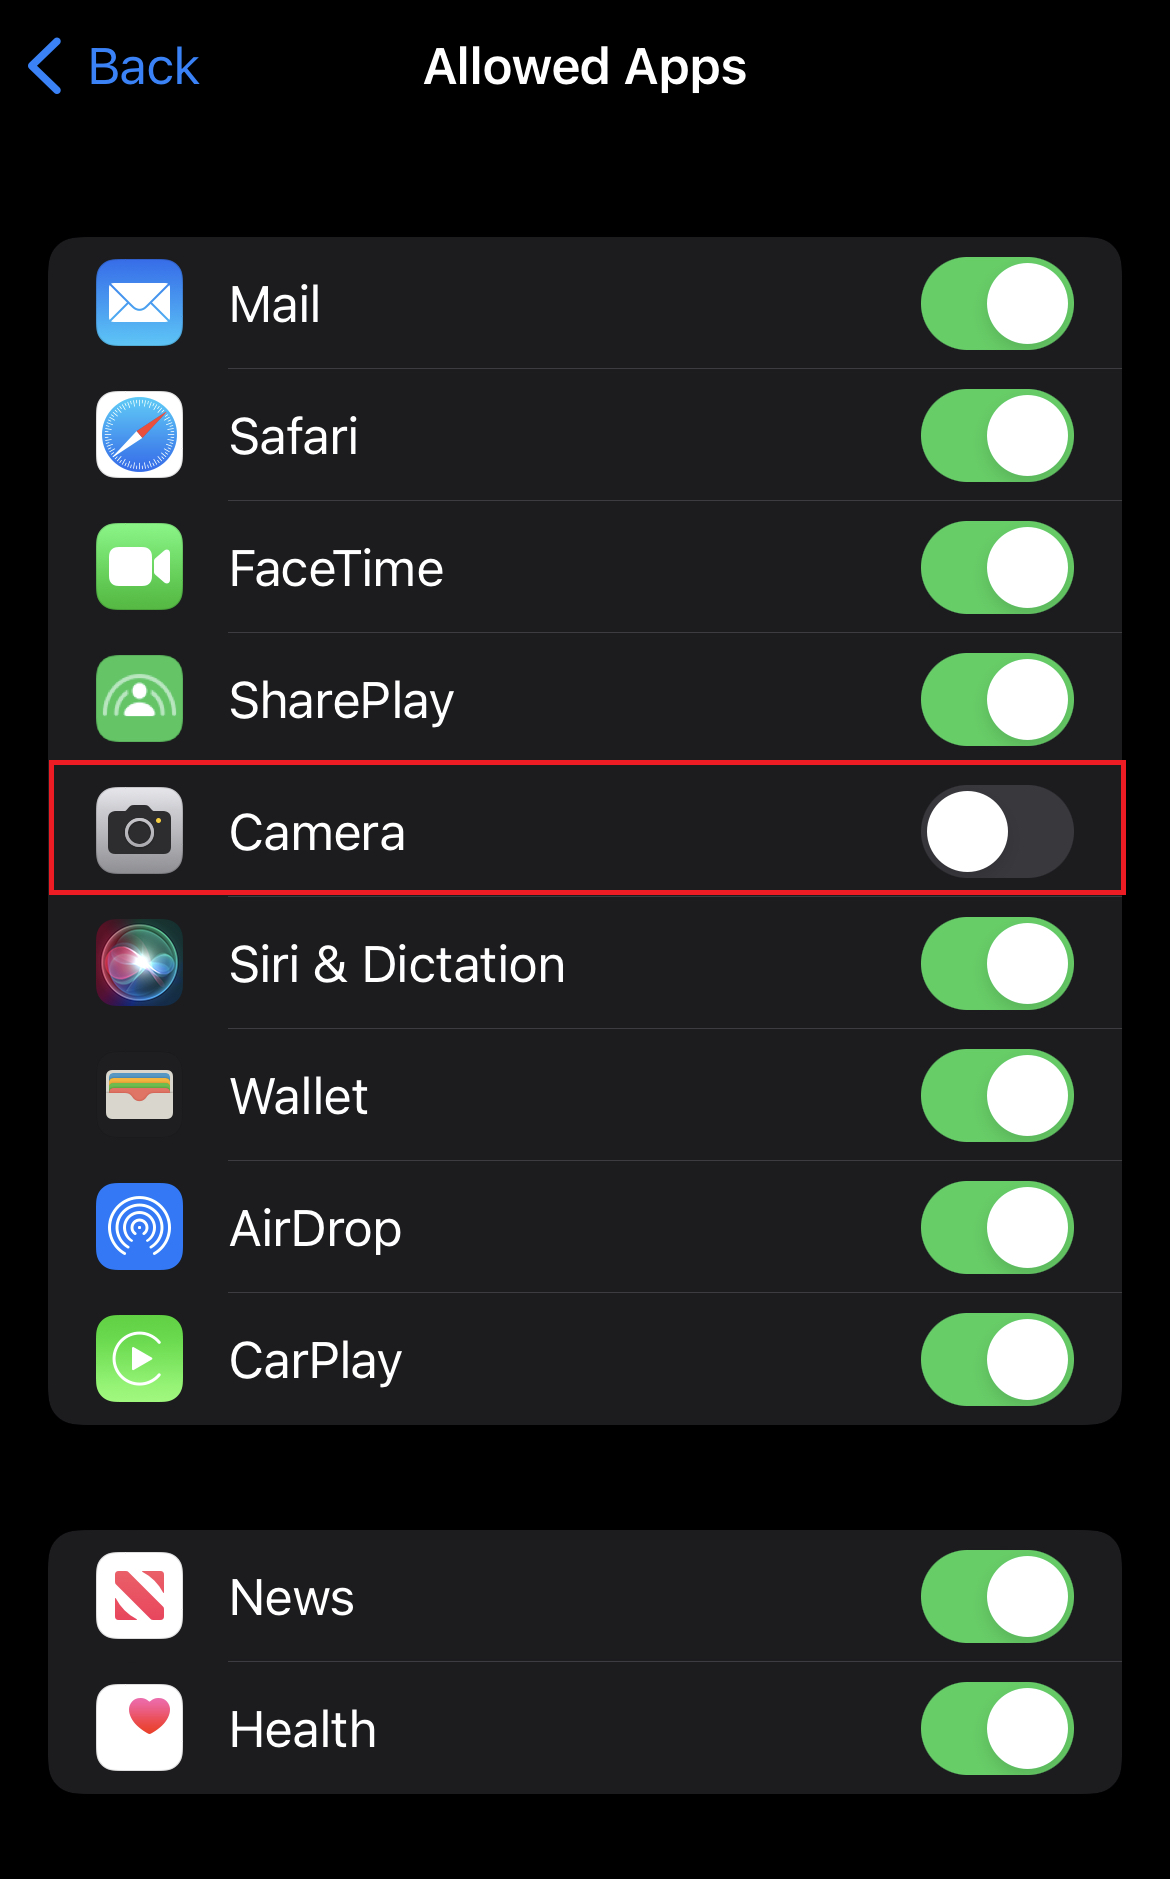
To block certain apps, tap Allowed Apps, then enter your passcode when prompted.
To block an app, turn off the toggle switch next to the app name. After turning this switch off, the app will not be accessible and will not show up in searches. To re-enable access to the app, return to this screen and toggle it back on.
Aside from blocking apps, you can return to the Content & Privacy Restrictions menu to enable a variety of different content restrictions, including access to certain iPhone features, TV shows, movies, books, and more.
How to Restrict App Access with Guided Access
If your iPhone is running iOS 11 or newer, you can use the Guided Access feature to prevent someone from using any apps on your phone aside from the app they’re currently using. This is a great option for parents as they can let their kids use their phones to play games, for example, without also allowing them access to content that may not be appropriate.
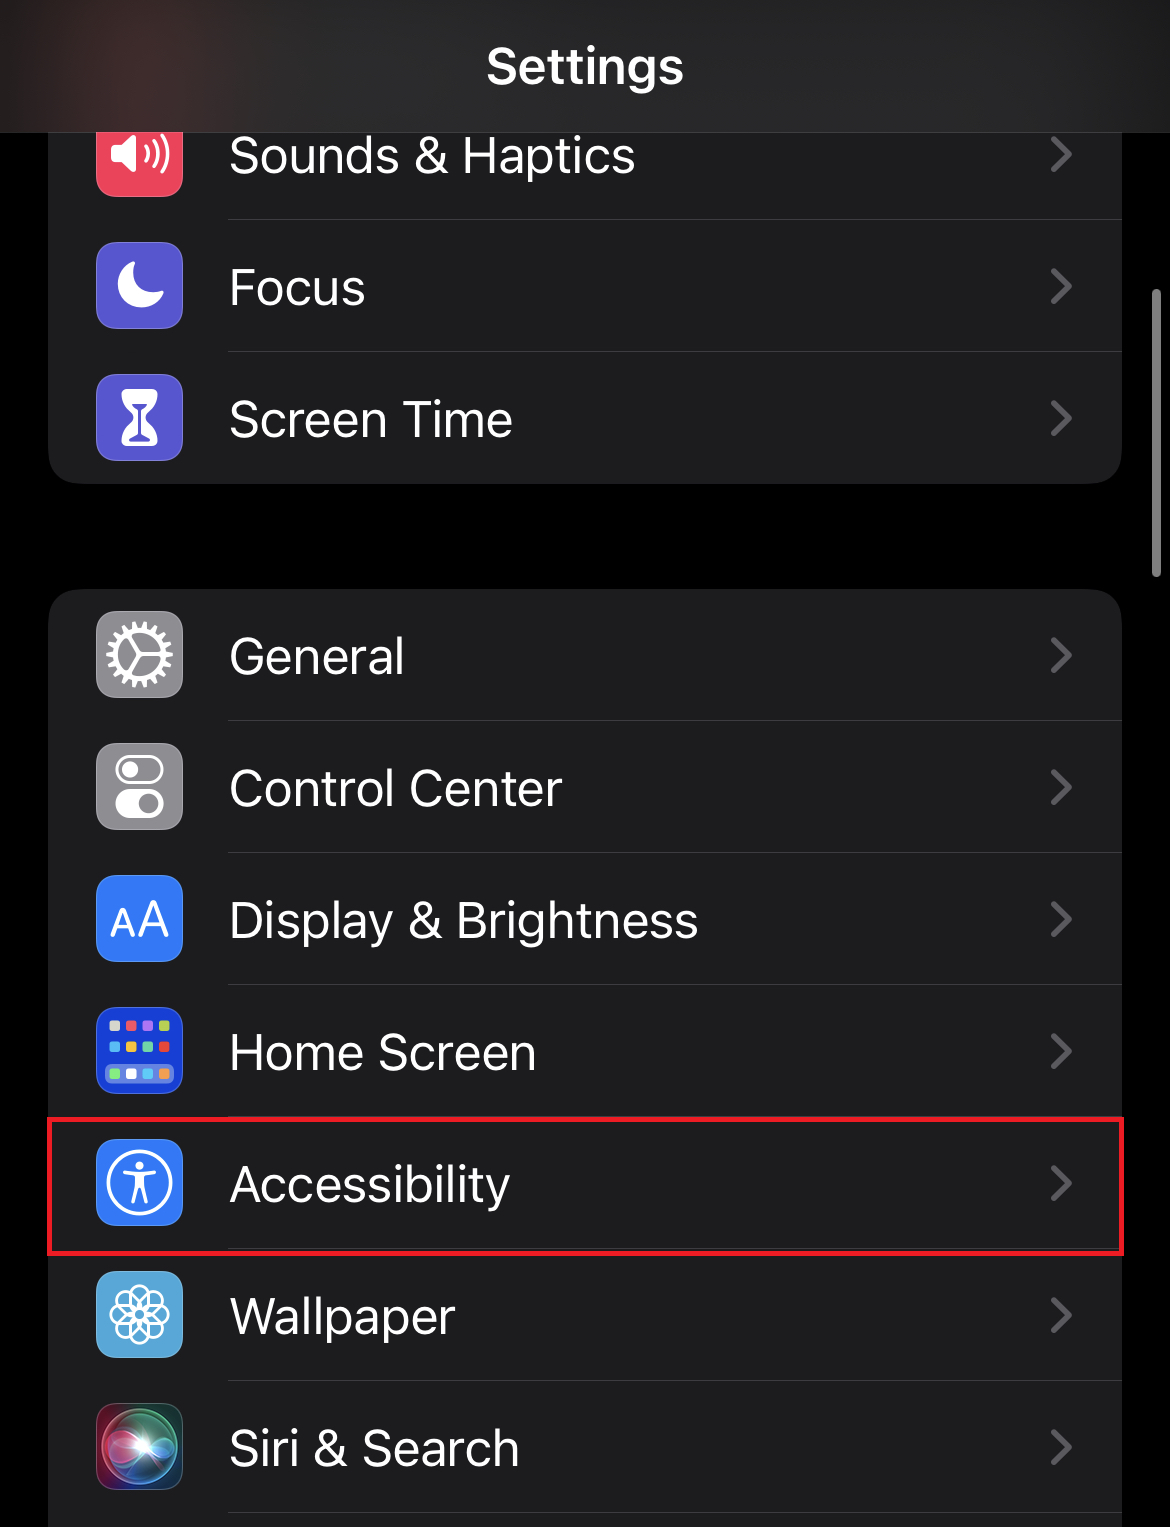
To use Guided Access, start by opening Settings, then tap Accessibility. (For iOS 11 and 12, tap General, then Accessibility.)
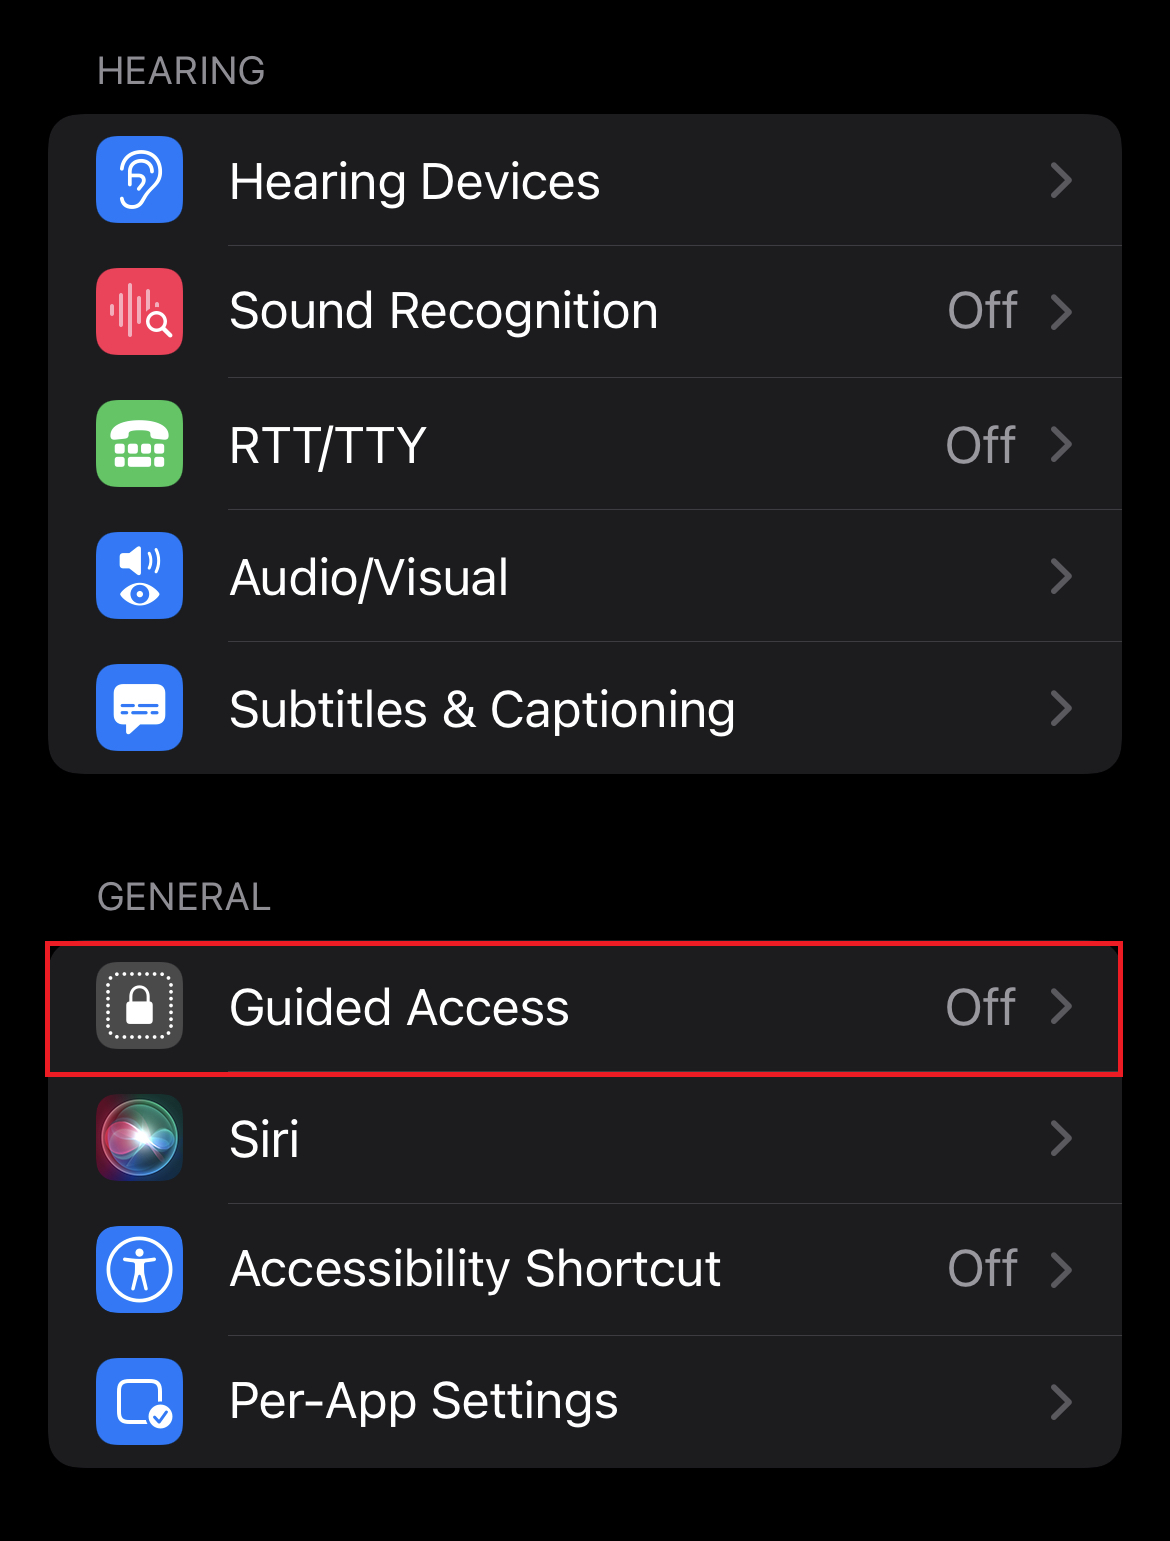
Next, scroll to the bottom of the Accessibility menu and tap Guided Access.
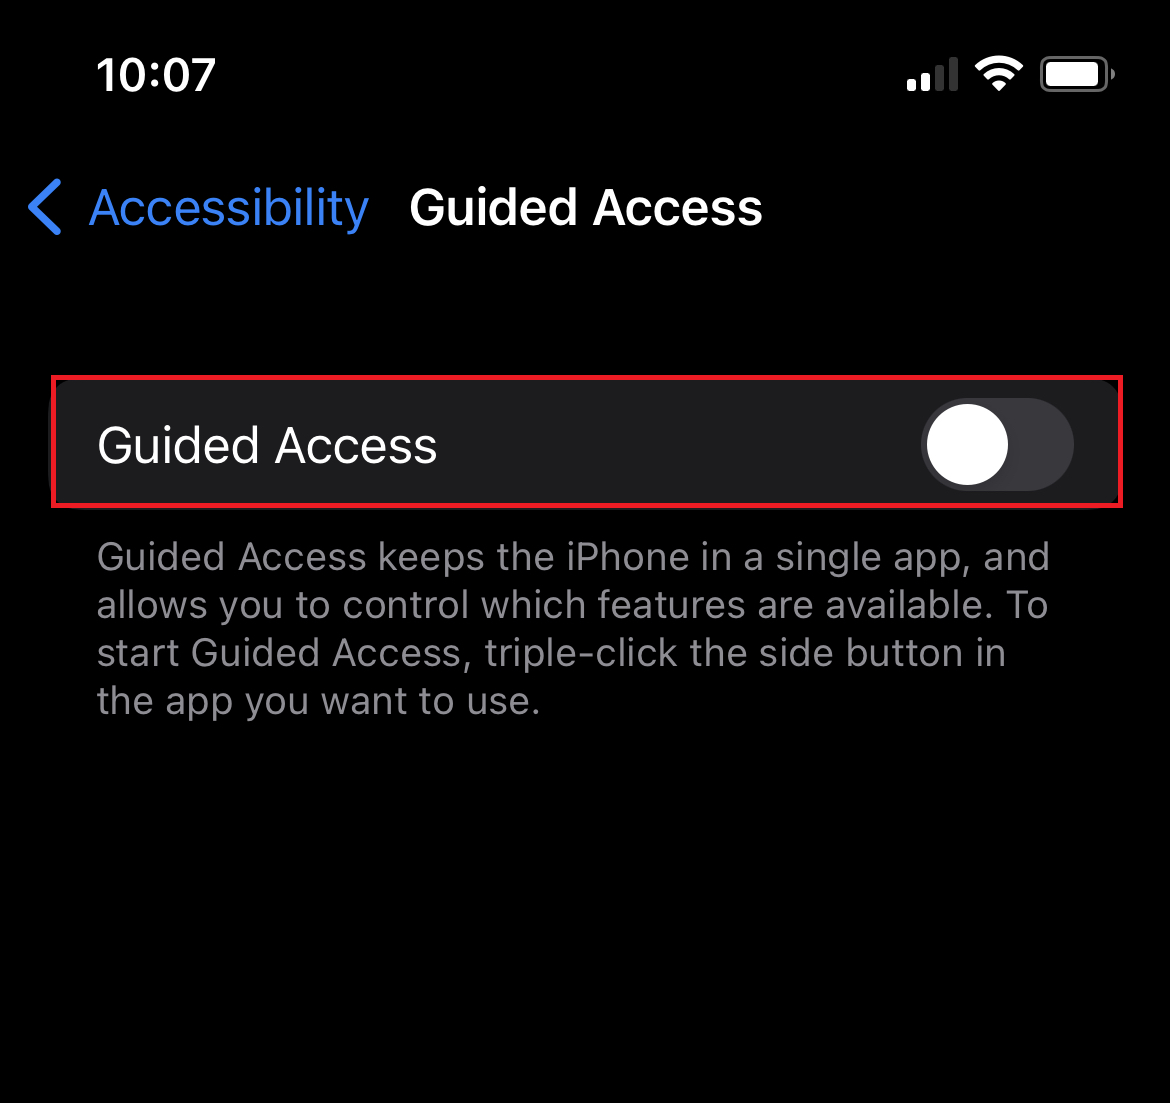
Toggle on Guided Access.
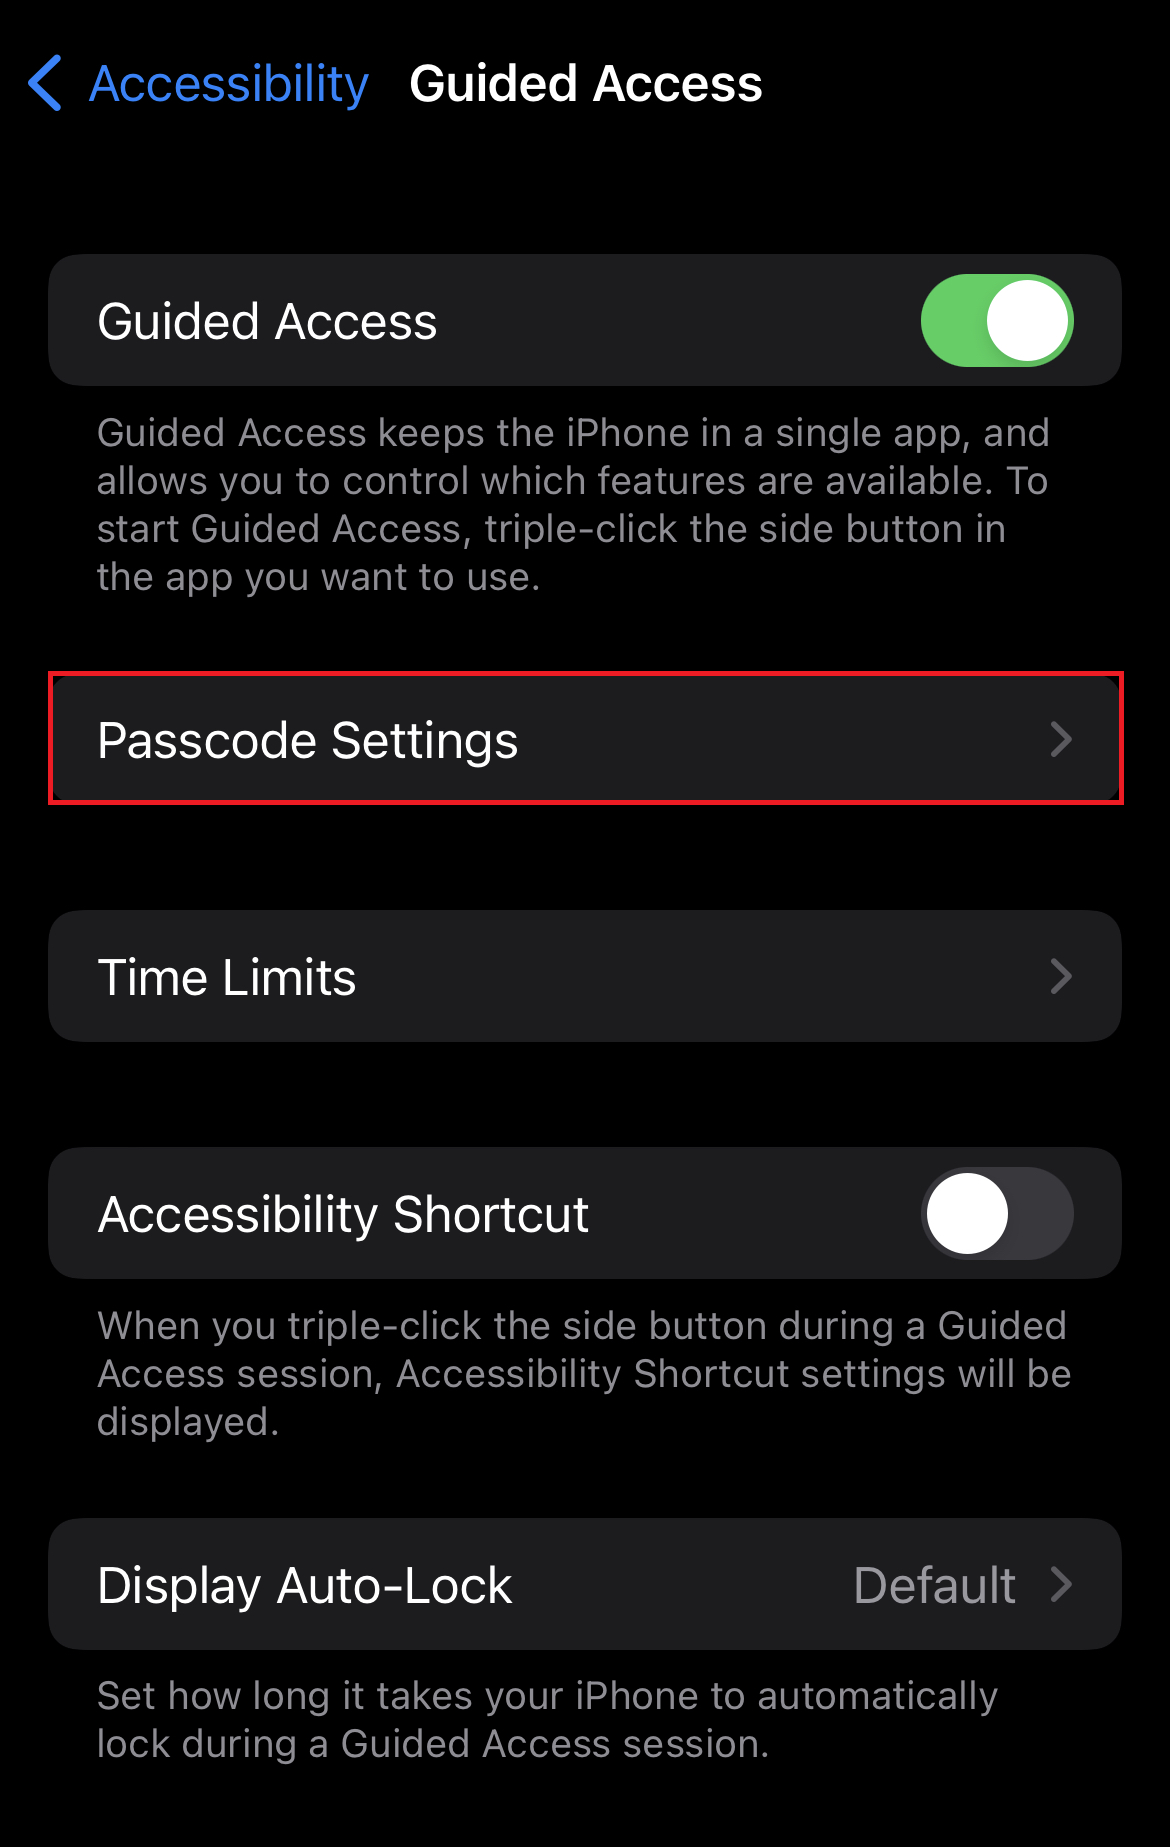
Tap Passcode Settings.
Next, tap Set Guided Access Passcode, then enter a six-digit passcode.
After enabling Guided Access and setting up your passcode, you can use Guided Access by opening any app and pressing the power button three times. This will open the in-app Guided Access menu.
From this menu, you can circle areas on the screen you would like to disable. For example, if your child is using your phone, you could circle the area of the screen that lets them make in-app purchases to prevent them from buying anything.
You can also tap Options in the bottom-right corner to enable or disable other features, including volume buttons, keyboards, and touch controls.
Once you’re ready to go, tap Start in the top-right corner to turn on Guided Access. While on, you won’t be able to leave the app or touch any part of the screen included in the circled areas.
To turn off Guided Access, tap the power button three times again, enter your passcode, then tap End in the top-left corner of your screen.


